Posts

Showing posts from 2019

LCC Demo Layout

Image
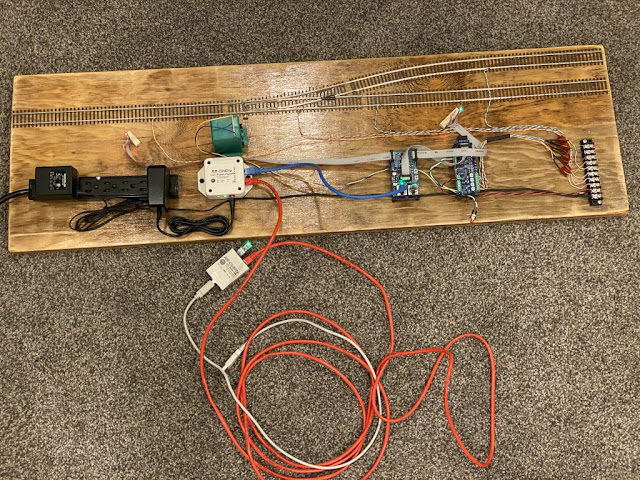
Dipping my toes into the waters of LCC has raised questions by fellow model railroaders in the area.  Last year I was asked to do a clinic on LCC, which went very well.  The clinic included passing around the various LCC components for folks to see, feel and smell.  However one consistent comment I received was that they wanted to see it operational.  Fair enough - and it really is nicer to see the pieces all pulled together and working to understand how it should look.  So for the upcoming clinics, I have pulled together a little demo layout. Overview of the LCC Demo Layout The goals for this layout included showing how it worked in a small, portable footprint.  As such, it was not set up for continuous running or even operation.  Instead it is a small section of track with a single turnout, some detection, and a few signals.  It contains a single node - an RR-Cirkits Signal-LCC board, with a single I/O card: a BOD4-CP. A few features of the demo layout: Built on a single

Scenery!

Image
With a lot of benchwork, trackwork, wiring and debugging over the past year, and add to that setting up for ops, we turned our attention to some scenery.  There is something about getting even a little scenery done that adds a wonderful finishing look to the layout. Nancy is, of course, the scenery master extraordinaire.  Here are a few pix of recent progress. Enjoy! Rockwork in progress at Wren Canyon Foreground being planned.  It generally does not end up as expected, so some adjusting is necessary. Looking good! Also starting to fill in the deck transition area around Coyote.  Special thanks to Dave Cochrun for his tips on using rosin paper.  This works great to get a general form in place and to protect the layout below.  Much less mess than the plaster over forms approach! Basic form in place... and ready to get to rock castings.

The Wye at Turay

Image
Following the first op session (OS), it was discovered that we needed a way to turn locomotives at Armstrong.  My vision was to have them back all the way to Valley Gate and turn on the turntable there.  Alas, that is a quarter to a third of the mainline run, and the feedback I got is it would be too far of a run; it would feel like a run to another town. Directly across from Armstrong is a switching area called Turay.  This is also where the staging tracks from "points east" come onto the layout as well as the future branch line out to Halcon Cement will originate.  The branch line will actually run OVER the helix going into staging. So I got to noodling on this.  Basically the branch running over the helix would act like one leg of the wye, while the tracks going down the helix would be the other.  I actually kept and installed the helix segments connecting the two to protect trains going down the helix.  So all I needed was a connector between the two legs of the wye a

Painting Track

Image
A bit behind in sharing some construction stories.  Frankly I post these just as much to remind myself what I did and used as it is to share the story with others who may want to know.  To me, track always looks better painted.  The bright silver side profile with the plastic reflective ties just takes so much away from the realism.  I know some who painstakingly hand paint ties and the sides of the rail.  I just don't see that as practical for the amount of track I need to do.  I also didn't want to spend the money on pre-weathered rail.  I used the basic Atlas code 83 flex track and turnouts.  Cheapest stuff out there. My go-to is Rust-Oleum's Camo paints, offered in spray cans.  It is opaque, dead flat, and goes on both metal and plastic without any issue.  The Earth Brown color is closest to the look I am wanting. WARNING: This is an oil-based paint.  So when spraying, be sure to use a LOT of ventilation!  Furthermore, when spraying, it will atomize

GNW Test Session #2

Image
Last week we had the second test run of the new GNW!  The biggest addition in this session was to test run the train sequence.  Seemed to work OK, but some tweaking to do.  All in all though, I think everyone had fun.  Kudos to operators Meeker, Kampsnider, Kersting and Mr/Mrs Botkins for tolerating trains without ANY blocked cars!  And then 2 switchers decided to poop out.  It was truly a pain and they took it all in stride.

Getting Closer to REAL Operations

Image
I am genuinely surprised by how much work is needed to adjust the previous operating plan to this new layout.  Frankly, it would have been easier to start from scratch!  I added about 30% additional cars.  Delightfully, I had stashed quite a few cars over the years (eh-em, owing to more than a few visits to hobby shops), and the balance came out about right.  Still, it was quite an effort to prep the cars, get car-cards made up, and then... the really arduous part... writing up way-bills for each one.  New car cards - written out and folded, ready for taping. All the rolling stock was brought up to the main yard or just above it.  This allowed me to muse on how each car would fit into the traffic scheme. A lot more cars here than it would appear! Locos and cabeese also had to get their cards. The next step which is currently under way is the development of a train sequence.  This will let me plan out the flow of trains such that they all can do there work with m