Following the first op session (OS), it was discovered that we needed a way to turn locomotives at Armstrong. My vision was to have them back all the way to Valley Gate and turn on the turntable there. Alas, that is a quarter to a third of the mainline run, and the feedback I got is it would be too far of a run; it would feel like a run to another town.
Directly across from Armstrong is a switching area called Turay. This is also where the staging tracks from "points east" come onto the layout as well as the future branch line out to Halcon Cement will originate. The branch line will actually run OVER the helix going into staging.
So I got to noodling on this. Basically the branch running over the helix would act like one leg of the wye, while the tracks going down the helix would be the other. I actually kept and installed the helix segments connecting the two to protect trains going down the helix. So all I needed was a connector between the two legs of the wye and we would have the wye.
But... I did not want an engine turning movement to tie up the main. So looking at the arrangement a little more, I decided if I ADDED a track parallel to the main, coming down the helix enough to provide a tail track for a few feet, and then come back up the helix to the branch line, I could have a wye without interfering with the main.
Here is how it turned out:
 |
| Track to left is branch line going up to Halcon Cement. Center 3 spurs are industrial tracks. NEW leg of wye is next one to the right. The 2 far right tracks are the main to staging. |
 |
| Looking the other way from the branch line, you can see the added wye track on the left, going to the wye tail. That benchwork was there, complete with the cork roadbed. It was salvaged from my good friend Dave Cochrun's Castle Rock and Pacific RR when it was dismantled. I kept the benchwork over the helix to protect the tracks going down the helix beneath. Now it has a purpose! Note that I had to cut a new hole into the backdrop. |
 |
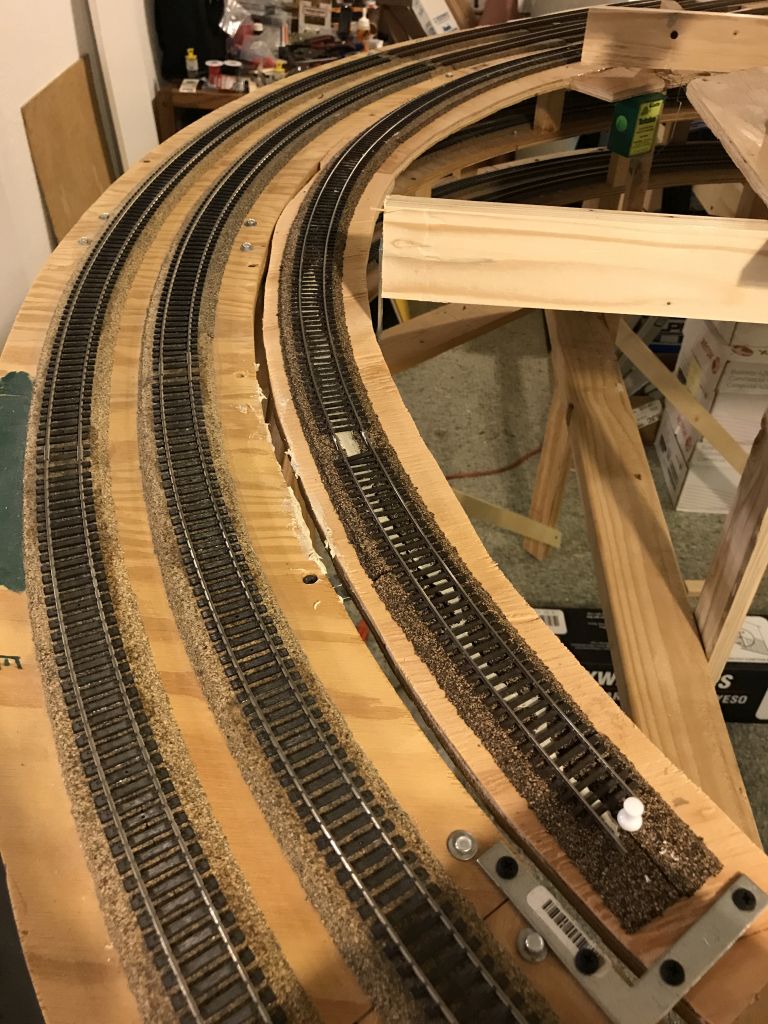
| The magic arrangement on the "back" side of the backdrop. The new line paralleling the main going to staging is the 3rd track from the left; the other 2 tracks on the left are the main tracks. The switch in the lower right foreground is the wye tail switch. And of course, the track curving to the right is the new connector to the branch. All in all, a very compact wye! |
 |
| I extended the tail track some 3 feet past the tail switch to provide enough room to turn some locos or even a few cars. Note the benchwork inside of the 2 mainline tracks is all new. I just added/supported as needed to append the wye tail. This really was the only benchwork needed for this very helpful addition. Note the wye tail turnout switch motor to the upper right of the photo (green & yellow cube in the pic). |
All was well. Until, of course, someone wanted to use it! Since this was behind the backdrop, it was difficult to operate. How does an operator know where their locomotive is without having to run behind the backdrop? Ah, enter some technology! Ebay sells 12V "backup cameras" as an aftermarket add-on for vehicles. The price cannot be beat: $12-$14 shipped to your door. I ordered 2 of them, one for the wye switch and another for the end of the wye tail, as well as a 12V power supply for the whole shebang, including the turnout motor. In this way an operator can see where they are and if they are clear of the points. A small control panel with indicators was built to control the Tortoise switch machine added to the wye switch.
 |
| Operator's can watch their locos clear the wye switch as well as know when they are nearing the end of the tail track with these monitors. The switch to the right controls the wye tail turnout; red and green indicate which way the turnout is thrown. |
Feedback from the operators is VERY positive. And we can turn locomotives and cars now!


Well done Detlef!
ReplyDelete