Soaking Tray
Work is progressing (slowly), and it's encouraging to see track get laid. As a part of this process, I am trying to reuse as much old track before starting to use the new. A lot of it came from a previous layout; a lot from others who were dismantling theirs and did not want to take the time to strip the track.
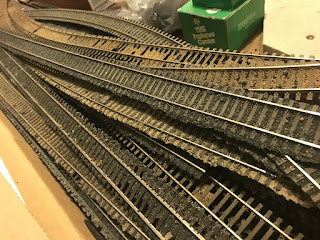
Soaking the roadbed allowed it to easily come up (after about 20-30 min). But the recycled track still had a lot of ballast and glue on it, making it useless for reuse. So sharing a technique to assist anyone who may be in a similar situation.

For switches, I just throw the turnouts in 5 gallon bucket for a few days. The plastic and nickel silver is not affected by the soaking, and the ballast just falls off as the glue dissolves. I even had a curved turnout I wanted to recycle, but it had some "Durhams Water Putty" on it from a roadway that crossed. Soaked it for about a week, and even the Durhams just fell off. Nice!
But the flex track with its 3' length did not do so well. Too long to fit into a bucket, it was just not working... two thirds clean, and the middle still with ballast.
Then an a-ha moment.... rain gutter material! So buzzed down to the nearest big-box hardware store and picked up a section of gutter and end-caps, both in vinyl plastic. The 10' trough was cheaper than the end caps, but whatever. Also picked up a small tube of caulk. The caps probably would hold, but did not want to take the chance, so I double caulked in the caps - inside and outside. I cut the trough down to about 6' as I thought the 10' length would be more of a trip hazard than anything else.

So I assembled the tray, caulked the ends, let it set overnight, and then filled the tray with water. In went the track. Wa-la! Clean track, ready for re-laying! All in, the tray cost just under $20; about the cost of 4 sections of Atlas NS flex track. Considering I have 20-30 sections of flex track I want to reuse, I think it was worth it.
Soaking the roadbed allowed it to easily come up (after about 20-30 min). But the recycled track still had a lot of ballast and glue on it, making it useless for reuse. So sharing a technique to assist anyone who may be in a similar situation.

For switches, I just throw the turnouts in 5 gallon bucket for a few days. The plastic and nickel silver is not affected by the soaking, and the ballast just falls off as the glue dissolves. I even had a curved turnout I wanted to recycle, but it had some "Durhams Water Putty" on it from a roadway that crossed. Soaked it for about a week, and even the Durhams just fell off. Nice!
But the flex track with its 3' length did not do so well. Too long to fit into a bucket, it was just not working... two thirds clean, and the middle still with ballast.
Then an a-ha moment.... rain gutter material! So buzzed down to the nearest big-box hardware store and picked up a section of gutter and end-caps, both in vinyl plastic. The 10' trough was cheaper than the end caps, but whatever. Also picked up a small tube of caulk. The caps probably would hold, but did not want to take the chance, so I double caulked in the caps - inside and outside. I cut the trough down to about 6' as I thought the 10' length would be more of a trip hazard than anything else.

So I assembled the tray, caulked the ends, let it set overnight, and then filled the tray with water. In went the track. Wa-la! Clean track, ready for re-laying! All in, the tray cost just under $20; about the cost of 4 sections of Atlas NS flex track. Considering I have 20-30 sections of flex track I want to reuse, I think it was worth it.


Comments
Post a Comment